

THE OFFICIAL WEBSITE OF THE HAMMER’S SLAMMERS
THE CRUCIBLE RULES SYSTEM HANDBOOK


Click thumbnail to enlarge


Stop that ship! - a battle for the Spaceport
So there was heavy outnumbering by the
attackers - five detachments versus two. They
even outpointed them, and were always going to
win the majority of the initiative rolls with all of
that officer material flying about but the
defenders were able to set up well and had the
easier objective.
Objectives
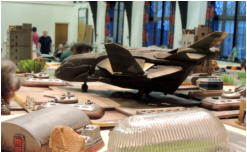
The Slammers were defending a drop ship
(cunningly built and thoughtfully loaned by my
mate Roger) - all they had to do was stop the
opposition blowing it up. The attackers, on the
other hand, couldn't do the deed by opening fire
on it. They had to park a vehicles under the drop
ship for a turn and unload one of the small
nuclear shaped charge devices they were all
carrying to destroy the ship. So they had to rush
and park, the Slammers had to discourage
them.
Set up
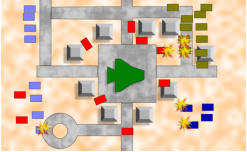
The Slammers (in Red - see map) set up around
the field and had to form a 360 degree perimeter
as they didn't know exactly what direction that
the opposition would be coming from. The
Alaudae and the heavier TAS camin if from the
north (Khaki and Dark Blue on the map) and the
lighter TAS (Light Blue) from the south. The
Drop Ship (Green) sat on a landing pad in the
middle of an industrial complex of roads and
buildings.
Turn 1
The Alaudae and heavier TAS won initiative and
pasted two of the heavier, uparmoured Blower
tanks and a lighter combat car. They knew they
had to get them or they'd be dead.
GO BACK TO PAGE 1

Page 2

GO FORWARD TO PAGE 3

John Treadaway - May 2014

The lighter TAS brought up the other flank
but - although they are good vehicles and
troops when facing mostly everyone else,
they had their work cut out. When the
Slammers made there move in turn one,
alternating initiative with the TAS police units,
the result was the TAS had lost one Angel
heavy tank, they'd lost the gun from another,
the Aluadae had taken crippling hits but were
still an effective fighting force and the TAS
police had lost a vehicle or two.
Turn 2
The Slammers again got their moves
somewhere in the middle of the attackers
and lost another Heavy Blower to a
buzzbomb attack from the rear via a TAS
bike mounted unit. The TAS heavies
deployed their infantry into a building and
started taking pot shots with buzzbombs but -
that one buzzbomb attack aside - none of the
missiles of lighter buzzbombs found a mark:
all were defeated by the strip systems on the
blowers or the tribarrels. On the later
vehicles, they had the advantage of being
able to use both against the missiles.
Turn 3
The Slammers enveloped the TAS police
units with combat cars and shooting them in
their vulnerable rear areas and picking off the
infantry, decimated them and forcing the rest
to do morale checks (which they did and
which encouraged almost all of what
remained to - wisely - leave). The Alaudae
had been forced to halt before they could get
to the Dropship but they hadn't been stopped
entirely.

